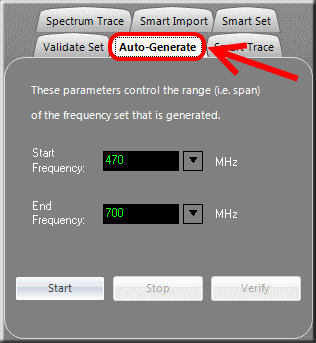
Generating a frequency set is easy. The 'Start Frequency' and 'End Frequency' parameters define the frequency range (or span). The Common Settings, discussed earlier, define the Intermod Stringency / Compatibility Level for the frequency set you are about to generate. To begin the computations press the 'Start' button. Depending on how large the span is this could take several seconds or even up to a minute or so. If you wish to interrupt the computations press the 'Stop' button.
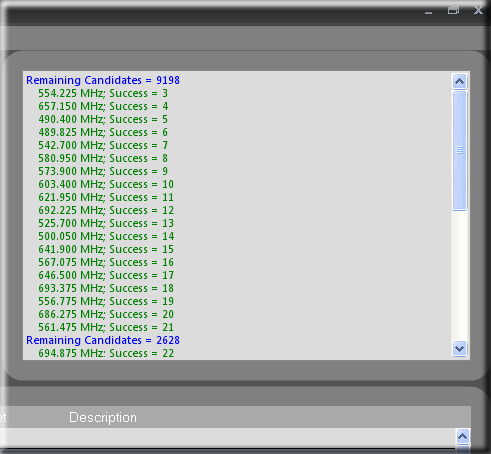
When the 'Start' button is pressed then the computations begin. The algorithm for computing intermodulation products requires many calculations -- there are thousands of permutations that are tested. As the computation proceeds the 'Output' window displays some of the results. Whenever a frequency meets the criteria for becoming a member of the intermod-compatible frequency set, the 'Output' window displays the frequency (in MHz) along with the (growing) size of the frequency set.
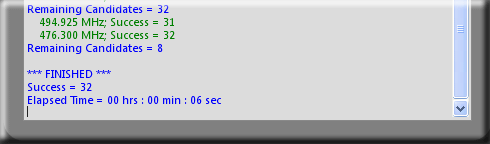
When the computation has completed then the 'Output' window will display '***FINISHED***' and the size of the frequency set that was just generated -- in the example above, the newly generated, intermod-compatible frequency set contains 32 frequencies.
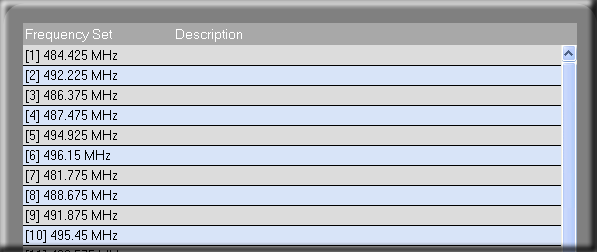
After the computation has been completed then the 'Results' window displays the frequencies in the newly generated, intermod-compatible frequency set. The order in which the frequencies are listed may be according to rank or sequentially. Please refer to the 'Rank or Sort Frequencies' setting for more information.

In addition to the 'Results' window, the frequencies in the newly generated, intermod-compatible frequency set are displayed graphically, represented by the vertical white lines. In the upper-right-hand corner of the view there is a small rectangle that displays the current [x] grid coordinate in MHz. As you move the mouse cursor around the chart then these coordinates are continuously updated. The colored markers above the vertical white lines indicate the intermod stringency for this particular frequency set (the key for the color-coding is along the right-hand side of the chart).
Verify the Frequency Set
You can learn a lot about frequency sets by experimenting with different stringencies and using the 'Verify' button. Here's an example:
Let's use a frequency range of 470 MHz to 500 MHz and we'll generate a "Lenient" frequency set -- i.e. only the CheckBox for 2Tx 3rd-order intermod products is checked. The computation is performed and our resultant frequency set contains approximately 29 frequencies we can then use for channel assignments. Keep in mind this frequency set is only guaranteed to be free of interference caused by 2Tx 3rd-order intermod products. Now, let's also check the CheckBox for 3Tx 3rd-order intermod products and then press the 'Verify' button.
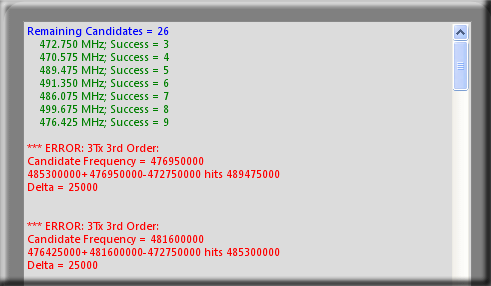
In Verify mode, the frequencies in the current frequency set are used as our starting candidates. As the original, "Lenient" frequency set is verified, you'll notice the 'Output' window now displays some errors. This is because the frequencies in the original frequency set were only guaranteed to be intermod-compatible for 2Tx 3rd-order products. However, when we included the CheckBox for 3Tx 3rd-order intermod products we added an additional criterion -- and now we see that some frequencies fail that test (which would be expected).
If you were to now look at the 'Results' window you'd see the new frequency set is smaller -- e.g. it probably contains approximately 14 frequencies (down from 29). We began with a "Lenient" frequency set that contained 29 frequencies, but when we increased the stringency by also requiring the set to be free of interference from 3Tx 3rd-order intermod products then some frequencies fail that test and drop out -- leaving us with a smaller (but more stringent) frequency set.