
This section provides basic instructions for installing and using Figaro -- a configuration tool for the WifiBuilder AP. Figaro allows you to easily change the local and WAN IP addresses, SSID, channel and security settings when using the WifiBuilder AP in production mode. Figaro runs on the following Windows operating systems: WinXP (SP3), Vista and Windows 7 (32-bit and 64-bit).
Please note that in most cases where WifiBuilder is being used as a standalone diagnostic tool on its own subnet (as described in the previous section) it is not necessary to run Figaro. That is, in standalone diagnostic mode there is no reason to change WifiBuilder's default IP address, SSID or security settings -- with one exception -- its default IP address of 192.168.1.2 is on the same subnet as the LAN adapter used for normal network activity.
Only when using WifiBuilder in production mode (i.e. as part of your normal network) or if its default IP address of 192.168.1.2 is on the same subnet as the LAN adapter used for normal network activity, should you then consider using Figaro to reconfigure the WifiBuilder AP.
Production Environment
System Requirements for Installing and Using Figaro
• PC running Windows XP Professional (SP3), Windows Vista, Windows 7 (32- or 64-bit)
• Microsoft .NET Framework version 3.0 (or later)
• Connection to one or more WifiBuilder APs (see previous section)
Installing and Using the Figaro Software
1) Before beginning the installation it will be necessary to download the latest version of the Figaro tool from here.
2) You will need administrative privileges in order to install the application software on your computer. Please login to an account on your computer that includes 'Administrator' rights before proceeding with the installation.
3) Run the Figaro installation / setup program. By default the application is installed under in the folder '\Program Files\NutsAboutNets\WifiBuilder\Figaro' and a desktop icon is created (labeled 'WifiBuilder Figaro').
4) When the installation has completed, launch the Figaro application by clicking the desktop icon. 
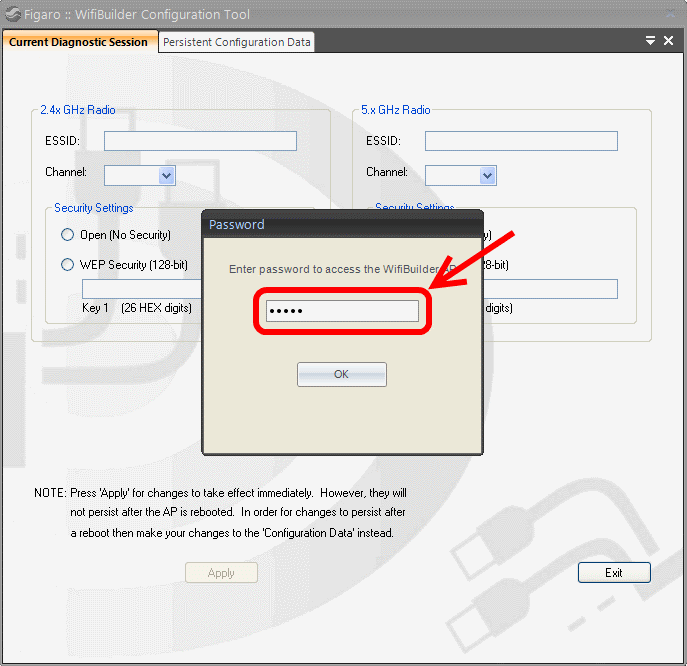
5) When Figaro starts a dialog box first appears that requires a password to access the WifiBuilder AP. The default password is 'hello'.
6) After entering the password another dialog box is displayed -- this one requests that you select a network interface and enter the IP address of a WifiBuilder AP. In the figure below, we select the LAN adapter whose IP address is 192.168.1.16 since this adapter is configured (see previous section) to use the same subnet as the WifiBuilder AP. We've also entered 192.168.1.2 (the default) for WifiBuilder's IP address. Please note that it is essential that WifiBuilder's IP address and the selected network interface use the same subnet.

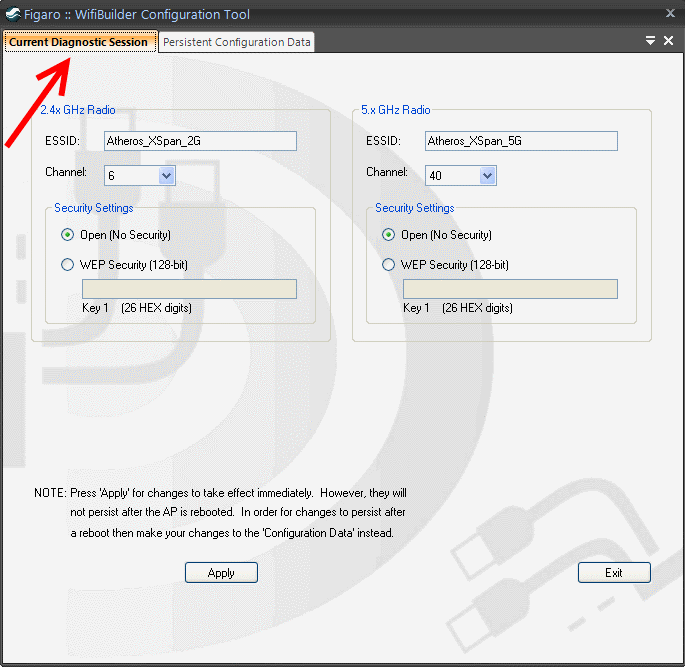
7) In Figaro's main dialog box there are two tabs -- 'Current Diagnostic Session' and 'Persistent Configuration Data'. These correspond to the two types of settings that can be changed.
Current Diagnostic Session:
When you change one of these settings and press 'Apply' it will remain in affect until the next time the WifiBuilder AP is rebooted. In other words, the changes you make here are not stored in the AP's flash memory and, hence, are not persistent.
ESSID (Extended Service Set ID):
The ESSID is the network name shared among all points in a wireless network. The SSID must be identical for all devices in the wireless network. Also, it allows one wireless network to be clearly distinguishable from another. The ESSID is case-sensitive and must not exceed 32 keyboard characters. The WifiBuilder AP has two ESSIDs -- one each for the 2.4x GHz and 5.x GHz radios.
Channel (2.4x GHz Radio):
This is the channel that will be used for Wireless-G and Wireless-N (2.4GHz) networking. In North America the allowed 2.4GHz channels are 1, 2, 3, 4, 5, 6, 7, 8, 9, 10, 11. In Europe, channels 12, and 13 are also allowed.
Channel (5.x GHz Radio): This is the channel that will be used for Wireless-A and Wireless-N (5GHz) networking.
In North America the allowed 5GHz channels are 36, 40, 44, 48, 52, 56, 60, 64, 149, 153, 157, 161, and 165. In Europe the allowed 5 GHz channels are 36, 40, 44, 48, 52, 56, 60, 64, 100, 104, 108, 112, 116, 120, 124, 128, 132, 136, and 140.
Security Settings:
Uses WEP Encryption -- a basic encryption method. You can choose between 'Open' (i.e. no security) or 128-bit WEP. If you
choose 128-bit WEP then it is also necessary to enter a sequence of 26 hexadecimal digits (i.e. [0-9] and [A-F]). For example: 0123456789ABCDEF0123456789
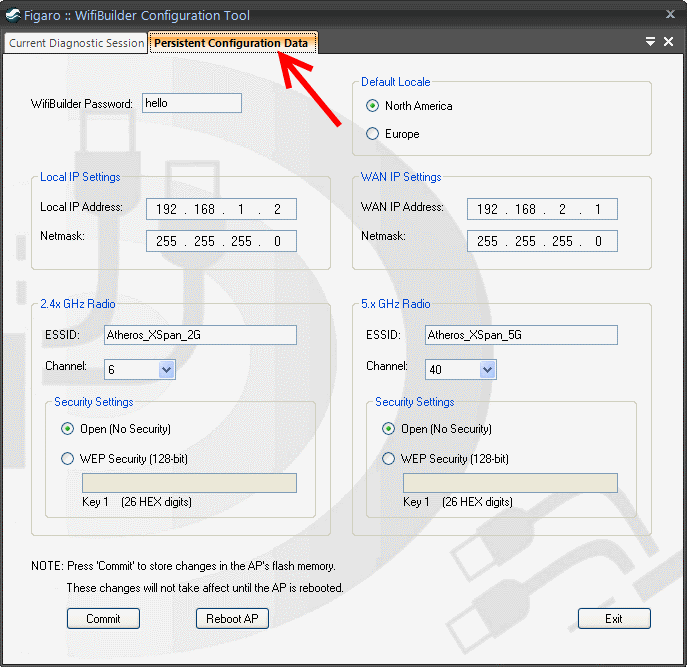
Persistent Configuration Data:
When you change one of these settings and press 'Commit' it will then be stored in the AP's flash memory -- but it won't take affect until the AP is rebooted. To reboot the AP press the 'Reboot AP' button.
WifiBuilder Password:
This is the password required to run Figaro or any desktop software application that accesses WifiBuilder's diagnostic capabilities.
Default Locale:
This controls which 802.11 channels are allowed -- you can choose either North America or Europe.
Local IP Settings:
This is WifiBuilder’s local IP address. This IP address must be on the same subnet as your PC's LAN adapter -- the one used to connect to the WifiBuilder AP (see previous section). By default, WifiBuilder's local IP address is 192.168.1.2.
WAN IP Settings:
This is the 'Default Gateway' that WifiBuilder uses to access the outside world. Your network administrator or ISP will provide you with the 'Gateway Address', which is the ISP server’s IP address.
Copyright © 2010, Nuts About Nets, LLC