
This section provides basic instructions for installing and using Profiler24x. Figaro runs on the following Windows operating systems: WinXP (SP3), Vista and Windows 7 (32-bit and 64-bit).
System Requirements for Installing and Using Profiler24x
• PC running Windows XP Professional (SP3), Windows Vista, Windows 7 (32- or 64-bit)
• Microsoft .NET Framework version 3.0 (or later)
• A minimum of 300 MB available hard disk space (for data recording)
• Connection to one or more WifiBuilder APs
Installing and Launching the Profiler24x Application
1) Before beginning the installation it will be necessary to download the latest version of Profiler24x from here. Also, if you have not already done so, it will be necessary to install one or more WifiBuilder APs -- here is a link to those instructions. Alternatively, if you do not have a WifiBuilder AP it is still possible to run Profiler24x in a fully-functional 'Demo Mode' using simulated data.
2) You will need administrative privileges in order to install the application software on your computer. Please login to an account on your computer that includes 'Administrator' rights before proceeding with the installation.
3) Run the Profiler24x setup program and follow the prompts for installing the application. Be sure to review the License Agreement as you progress through the installation procedure. When the Setup Wizard has completed then click the 'Finish' button. Please note the installation program does NOT install any driver software. All communication between between the Profiler24x and WifiBuilder AP is accomplished using TCP/IP. By default the application is installed under in the folder '\Program Files\NutsAboutNets\WifiBuilder\Profiler24x' and a desktop icon is created (labeled 'WifiBuilder Profiler24x').
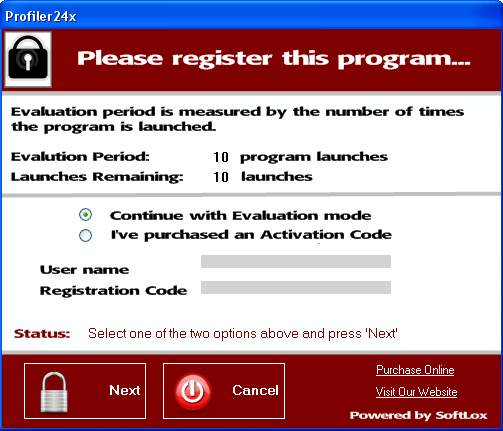
4) The first time the application is launched you will be prompted to register the application. If you have not yet purchased an Activation Code you can still launch the application a maximum of 10 times during the evaluation period. Thereafter an Activation Code will be required. If you do have an Activation Code then you can enter it at this time by selecting 'I've Purchased an Activation Code'. The Activation Code is 21-characters long and begins with 'PROF24X...'.
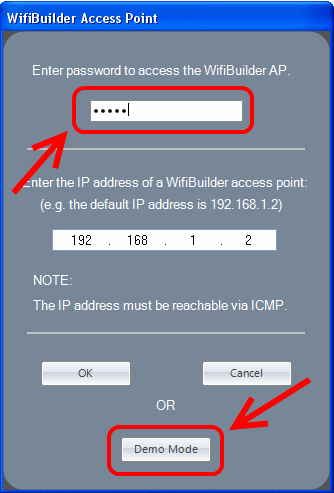
5) After the application launches you will be asked to enter a password in order to access the diagnostic capabilities of the WifiBuilder AP. The default password is 'hello'. Press 'OK' and you are then ready to begin using Profiler24x. Also, the Profiler24x application needs to know the IP address of the WifiBuilder AP -- this is the Default gateway address for the LAN adapter used to connect to the WifiBuilder AP. The default IP address for the WifiBuilder AP is 192.168.1.2. Alternatively, if you do not have a WifiBuilder AP installed but would still like to evaluate the application then press the 'Demo Mode' button. In 'Demo Mode' the application is fully functional but uses simulated data.
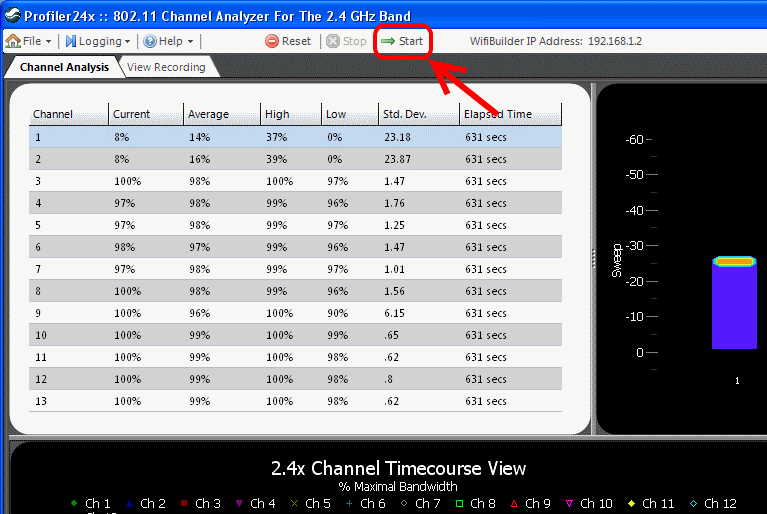
6) To begin scanning channels and collecting data, press the 'Start' button. You can also pause data collection by pressing the 'Stop' button. The 'Reset' button resets all charts to their initial state (before data collection started).
Copyright © 2010, Nuts About Nets, LLC